Need a Place to Hike? Here are 8 Awesome Treks in Utah
‘Need A Place to Hike?’ Series OVERVIEW
I get a lot of questions about travel recommendations. And I mean a lot. Loads of different people ask for tips on hiking, traveling abroad, about states in the US that I’ve spent only a handful of weeks in, but almost all the questions are the same:
What are your tips for backpacking? (Click the link to find out.) Where should I go in Utah on a hiking trip? What should I see in Ireland if I only have a few days? And so it goes.
Well, this is my answer to one of those questions.
What you’ll find below is the second part of a series. While this article specifically covers Utah, other parts of the series will contain my recommendations for more hikes in other states and regions, as well as cities and landmarks you should visit in the US and abroad.
So if you’ve messaged me about suggestions and I’ve sent you this link, now you understand why. It’s just slightly more convenient for me.
Enjoy!

Camping in Bryce Canyon National Park
TRAIL RATINGS & EXPERIENCE LEVELS EXPLAINED
INEXPERIENCED HIKER
An individual who does not regularly hike and hasn’t been on a hike more than a few miles.
EXPERIENCED HIKER
An individual who has completed longer hikes (greater than 10 miles in a day,) multiple-day hikes, or someone who hikes regularly.
DIFFICULTY - BEGINNER
Most inexperienced hikers could handle this.
DIFFICULTY - MODERATE
Inexperienced hikers should continue with caution after proper research. Experienced hikers should be fine.
DIFFICULTY - EXPERIENCED
Inexperienced hikers should avoid these until they feel absolutely ready to attempt them. Experienced hikers will be challenged in some way.
IMPORTANT NOTE
Remember, these ratings are subjective. I made them up myself based on my experience. Additionally, you will notice that I reference AllTrails quite a bit; this is a great resource that has extensive information on each trail. You can click the blue-green hyperlinks throughout for more stats and photos!

8 Awesome Hiking Trails in UTAH
ANGELS LANDING TRAIL, ZION NATIONAL PARK
START LOCATION
The Grotto Trailhead - Zion Canyon
DISTANCE + ELEVATION GAIN
DIFFICULTY
Moderate to Experienced
DESCRIPTION
This hike is more terrifying than it is difficult. If you’re truly afraid of heights, do not attempt.
I consider myself a fairly experienced hiker, and I did not complete the trail. Nonetheless, I visited in late February, and the path was covered in snow and ice. So you have a choice to make: go in the summer and deal with unfathomable crowds, or go in the winter and increase the risk of death. Your choice! (I recommend winter.)
This trail is fairly steep, but there is a path that guides visitors to the top. It’d be nearly impossible to get lost. Where the path ends, a metal chain begins. This is necessary because falling off either side results in a 430 foot vertical drop.
All dangers considered, I loved this hike. It has some of the most rewarding views; and at the end of the day, it provides memories that will no doubt last a lifetime.
BRYCE POINT TO PEEKABOO LOOP, BRYCE CANYON NATIONAL PARK
DIFFICULTY
Moderate
DISTANCE + ELEVATION GAIN
DESCRIPTION
When I chose to do this hike, I’d already done a portion of the Under the Rim Trail that same morning, which is next on this list. I was looking forward to diving into the hoodoos that Bryce Canyon is so well known for.
After a while, though, the Under the Rim Trail began to leave these unique features behind for a different kind of trail. While it was still beautiful, it wasn’t exactly what I was going for at that moment.
I regrouped at the trailhead parking lot then followed Bryce Point to Peekaboo Loop. Now this was what I was looking for.
The loop allows you to weave between the other-worldly features known as hoodoos, additionally named earth pyramids or fairy chimneys. You’re totally immersed by them, surrounded and guarded by them. It feels like you’re hiking on some distant planet.
That’s what makes Bryce Canyon, and much of Utah honestly, so unique. If you’re not used to these odd and mystifying landscapes, they completely transport you.
I will offer one warning. I saw massive paw prints in the snow when I was there, and the park was almost completely empty in February. If you go alone in the heart of winter, keep your eyes peeled. There are caves in the sides of the rock that could be home to any wild creature.
[Video Below also covers the Peekaboo Loop Trail, and it’s linked here and in the title]

Peekaboo Loop, Bryce Canyon National Park, Utah
UNDER THE RIM TRAIL, BRYCE CANYON NATIONAL PARK
DIFFICULTY
Heavily Experienced
DISTANCE + ELEVATION GAIN
DESCRIPTION
As you can tell from my account above, I didn’t exactly complete this trail. Though it’s beautiful and unique, it takes you away from the mysterious hoodoos that Bryce Canyon is famed for. It’s also extremely long and arduous, so the Under the Rim Trail is not for the faint of heart.
You can start this hike from the Bryce Point Trailhead, just like the Peekaboo Loop. (That also means the Peekaboo Loop isn’t hard to access if you find that the Under the Rim Trail isn’t for you.)
Nonetheless, it’s still a hike I’d recommend if you have more than a couple days in Bryce Canyon. Hit the Peekaboo Loop first, then head on this trail for a genuinely fun and exciting challenge.
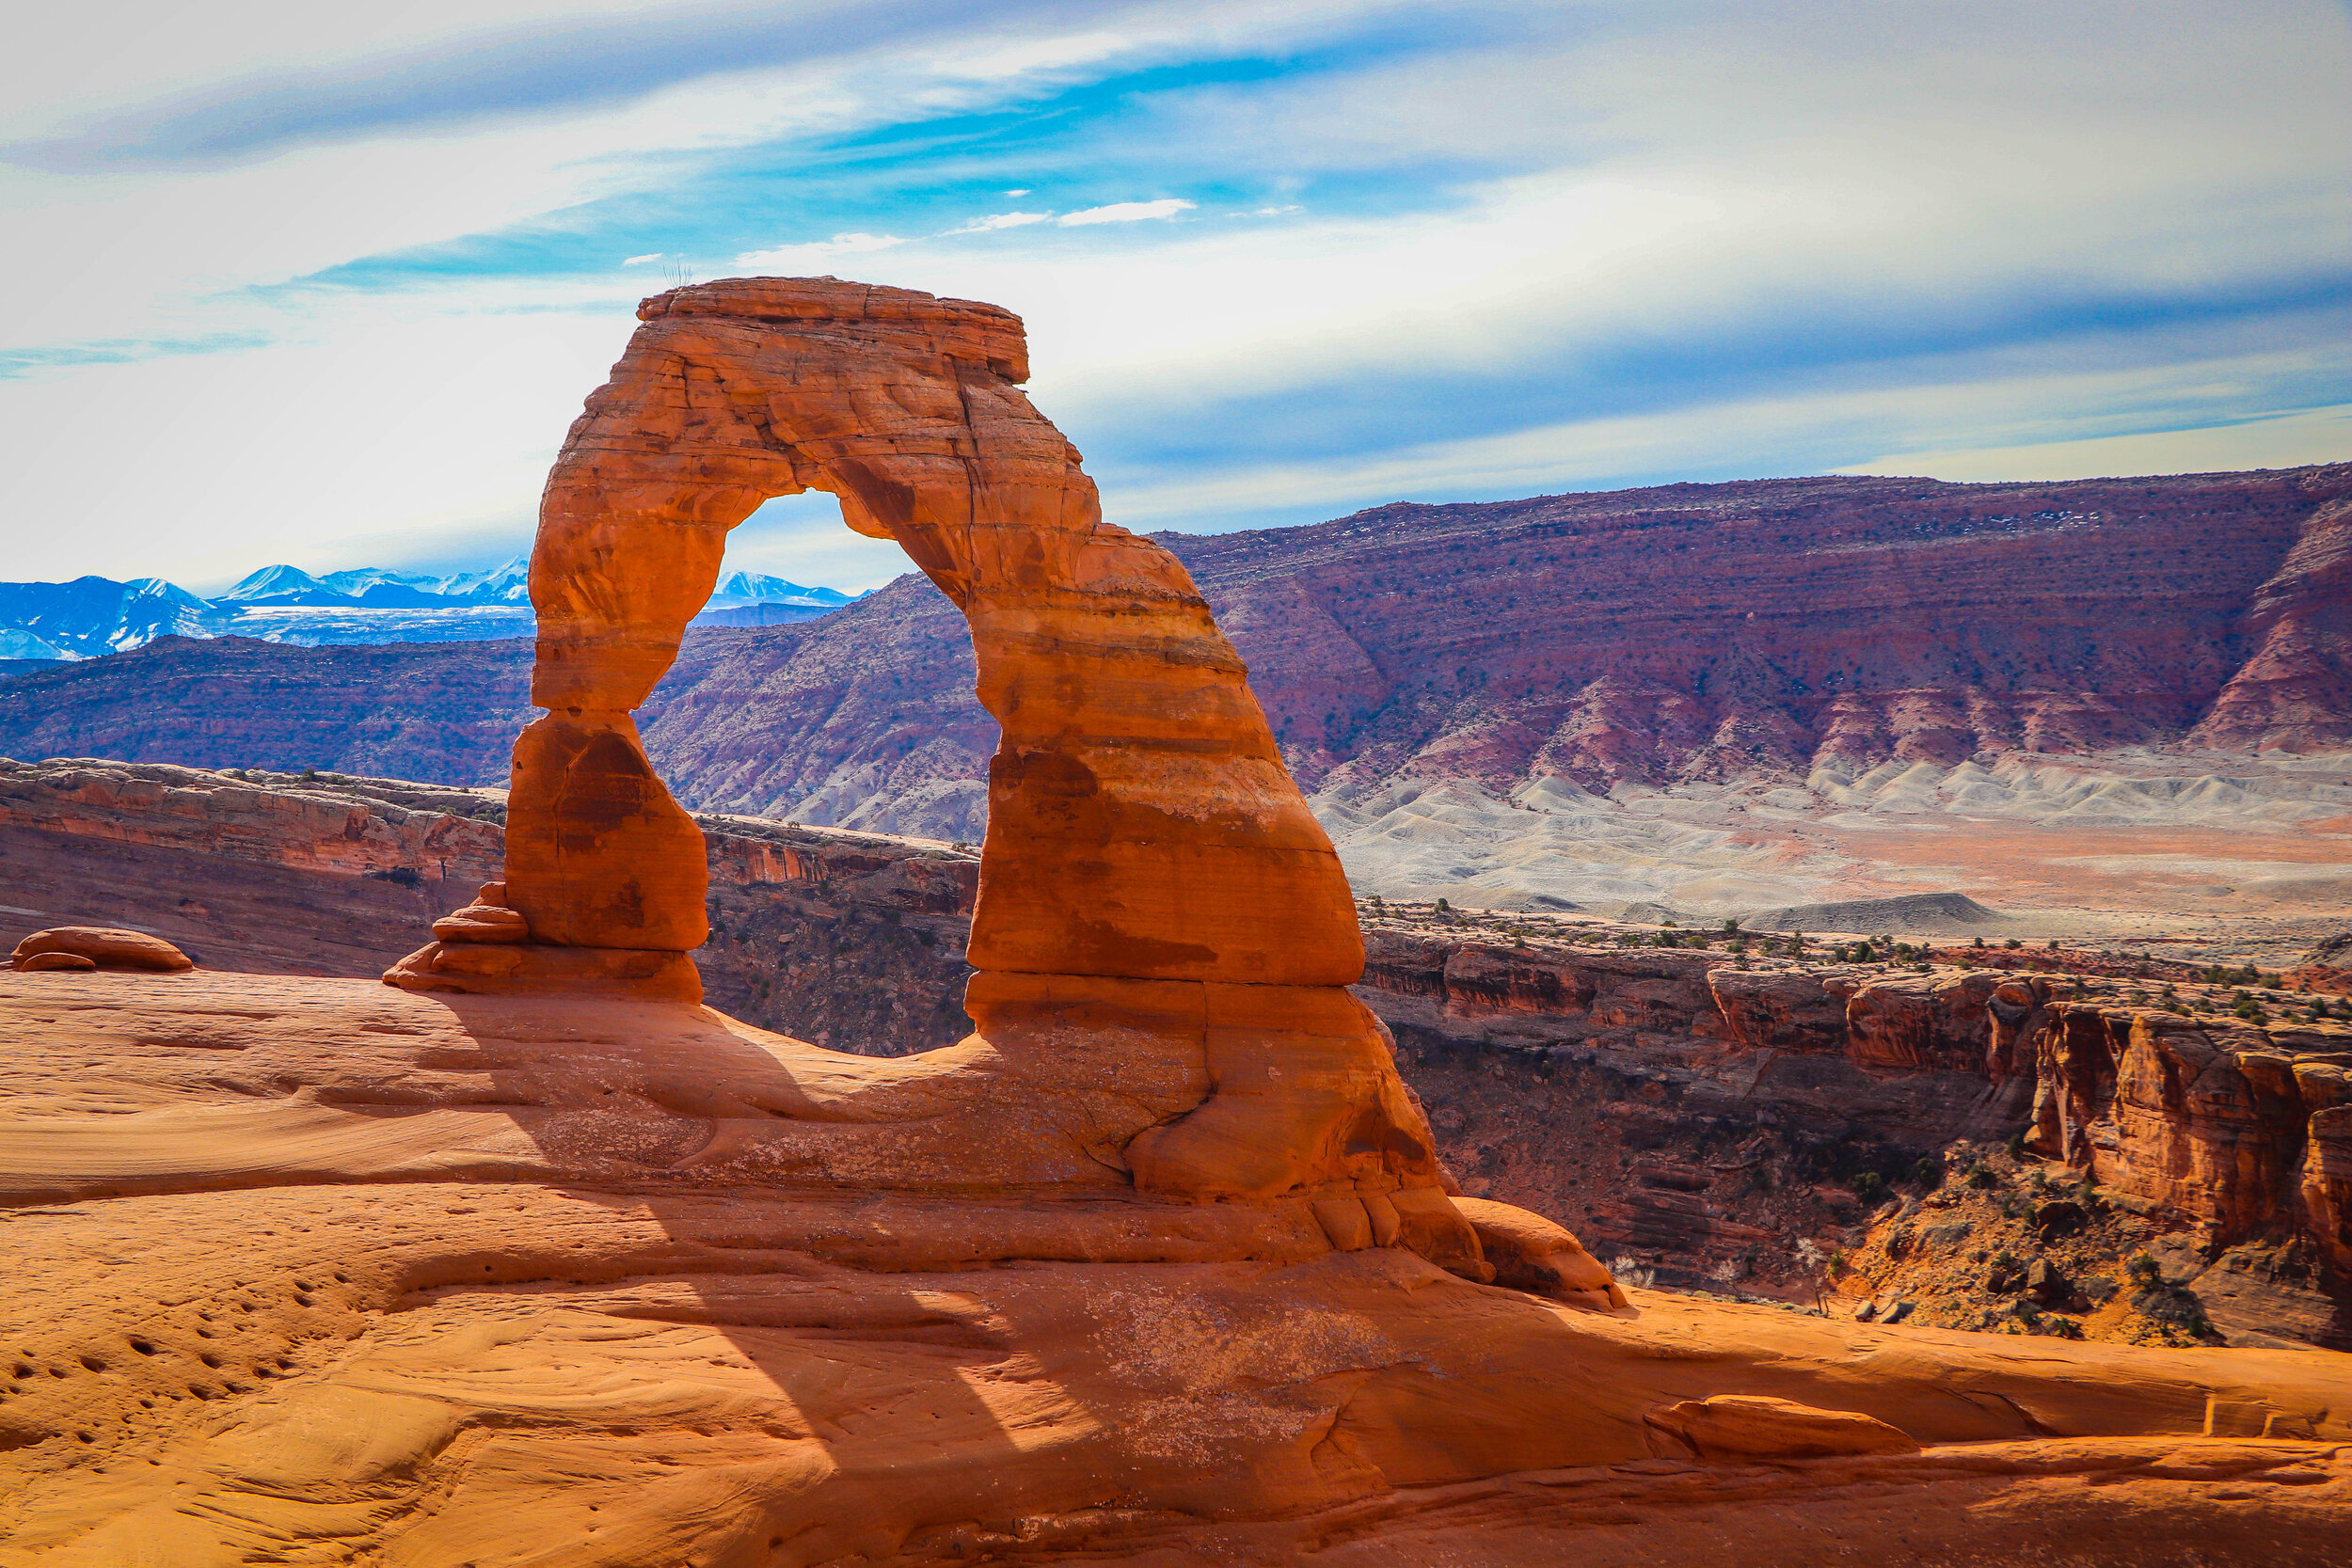
DELICATE ARCH TRAIL, ARCHES NATIONAL PARK
DIFFICULTY
Beginner to Moderate
DISTANCE + ELEVATION GAIN
DESCRIPTION
If you’ve ever heard of Arches National Park, odds are that you’ve heard of Delicate Arch. It’s arguably the most famous of the ridiculously cool natural structures, and it’s not that hard to access.
If you want to do the hike to Delicate Arch, it’s about three miles, and the elevation gain is nothing to worry about. This is an easier hike for sure, especially in the cooler winter months.
You’d hardly ever get a moment alone on this trail, though, and if you want any chance of getting a good photo (without photshopping a hundred people out of it,) you better go before busy season.
I got up around 7:00 AM on an early March morning to experience Delicate Arch while it was quiet. From the video below, you can see that it paid off. As I walked back down to my vehicle, I passed a dozen or so people who would start creating the (much smaller than usual) viewing party.
I truly believe everyone should witness this natural work of art… sooner rather than later. For these arches don’t last forever. One of the latest to collapse was Wall Arch, located on the Devils Garden Trail. In 2008, it crumbled to the ground in the middle of a summer night.
Delicate Arch awaits the same fate. So go check it out before it’s gone.
DEVILS GARDEN TRAILHEAD TO LANDSCAPE ARCH TO DOUBLE O ARCHES TO NAVAJO ARCH, ARCHES NATIONAL PARK
START LOCATION
Devils Garden Trailhead - Arches National Park
DIFFICULTY
Moderate [Primitive Trail - Caution: Less Obviously Marked]
DISTANCE + ELEVATION GAIN
DESCRIPTION
This trail is downright awesome. There were a decent amount of people on it, even in the winter months. So this is a great trek if you’re aiming to be more social.
It’s probably well-trafficked because there are multiple (and very logical) landmarks throughout where you can conclude your walk and turn back. That makes it fairly easy, especially if you don’t go all the way to Double O Arches.
That doesn’t take away from the challenge, though. This is not necessarily a trail. It starts off as one from the Devils Garden Trail to Landscape Arch, but after that it becomes a primitive trail.
I’d never heard of this before, and I didn’t quite understand what it meant at first. I quickly learned.
You abandon the trail to follow a path of sorts, guided by little arrows on rocks, various signs, and cairns. Click the video below for a better idea of what that’s like. (It’s extremely fun and liberating.)
You begin to carve your own path through this maze of rock, and the views throughout are nothing short of jaw-dropping. This ‘trail’ gives you a chance to intimately connect with the landscape and choose your own adventure.
My only warning: parts of the trek are confusing, so it is easy to get lost. I was lost for over 10 minutes in the maze, and I can guarantee you I would’ve started to panic had there not been people around to guide the way.
I would recommend bringing a smartphone or GPS device, and that goes for any hike you don’t know well. AllTrails has downloadable versions of their maps, and a smartphone’s GPS system still works even on Airplane Mode. (That’s a helpful tip if you don’t have service or need to conserve battery.)
THE FIERY FURNACE, ARCHES NATIONAL PARK

The Fiery Furnace, Arches National Park
DIFFICULTY
Experienced [Permit Required]
DISTANCE + ELEVATION GAIN
DESCRIPTION
This has to be one of my all-time favorite hiking experiences. I visited during the beginning of March, so the park was virtually empty, save for two other hikers.
I joined forces with the older couple, and together we attempted to wind our way through The Fiery Furnace maze.
This hike is unlike any other, and that’s why you have to acquire a permit from the park office: you pay a small fee for some basic training on navigating the maze and emergency procedures.
I would highly recommend this hike to anyone. It’s not traditional, but you wander between rock walls, through crevasses, and climb over boulders in an attempt to simply find your way back out.
Proceed with caution, and have a blast!
SAND DUNE ARCH TO BROKEN ARCH TRAIL, ARCHES NATIONAL PARK

Broken Arch, Arches National Park
DIFFICULTY
Beginner
DISTANCE + ELEVATION GAIN
DESCRIPTION
This is a very easy hike. You can park your car in a lot off the main park road; and without having any real incline, you can visit one of the more secluded arches: Sand Dune Arch.
Check out the video below, which includes Sand Dune Arch, Broken Arch, and Skyline Arch.
Even though there are signs guiding the way, Sand Dune Arch is hidden by massive rock formations, which makes it feel more personal. There’s no grand vista or a massive crowd aiming to get the best photo; it’s just you and the arch, surrounded by high stone walls. (At least that was the case on March 1st, 2018.)
You can then follow the path to Broken Arch (pictured above.) It’s also easy to access, though it’s much more out in the open. I assume in the busier months that Broken Arch would be swarmed. Still, you can’t go wrong checking it out.
This hike is short and not at all difficult, but it’s fun and allows you explore the arches differently than you would on other trails.
SKYLINE ARCH TRAIL, ARCHES NATIONAL PARK
DIFFICULTY
Beginner
DISTANCE + ELEVATION GAIN
DESCRIPTION
I believe this is the shortest hike I’ve recommended on this list and the Colorado list. It’s basically a stroll from the road, but it’s a good introductory arch. You can actually see it from your vehicle, but it’s cool to pop out in Arches for anything. (If memory serves, it’s a 16-mile drive through the park to the Devils Garden Campground, so it’s nice to stretch the legs.)
Check out Skyline Arch in the photo below, then go see this and all the others on your next trip to Utah!

Skyline Arch, Arches National Park

Have any thoughts on this blog post? If so, let me know in the comments. I love feedback, so don’t hesitate to reach out!
If you really loved this article, make sure to like below and share it with others who will enjoy it as well.
Thanks for reading; keep an eye out for future blog posts; and happy reading! - Cullan